들어가며 

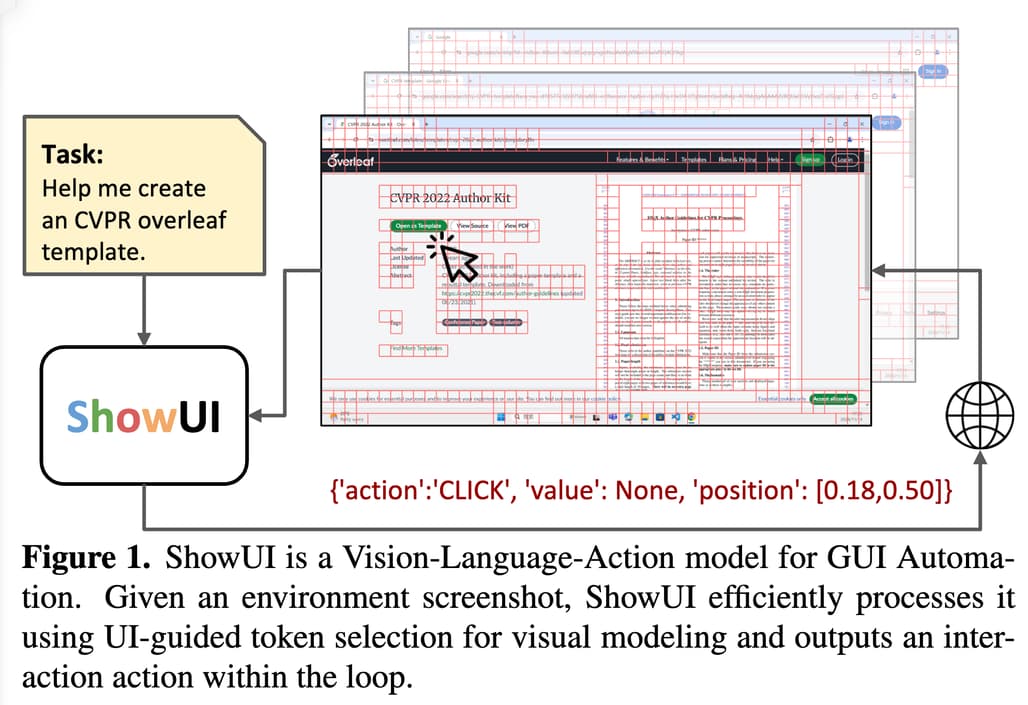
얼마 전 Claude의 GUI Agent(Computer-Use) 활용 사례에 대한 초기 연구를 소개해드렸었는데요, 이번에는 해당 연구 및 Computer-Use-OOTB를 공개한 ShowLab에서 ShowUI라는 VLA(Vision-Language-Action, 시각-언어-실행) 모델을 공개한 것을 발견하여 소개드립니다. ShowUI는 Vision Language Model인 Qwen2-VL-2를 기반으로 만들어졌으며, 시각적 중복성을 줄이고 다양한 UI에서 효과적으로 동작합니다.
ShowUI 연구 소개
ShowUI는 GUI(그래픽 사용자 인터페이스)와 상호작용하는 시각-언어-실행(VLA, Vision-Language-Action) 모델로, 스크린샷을 시각적으로 분석하고, 컨텍스트에 따른 명령을 이해하며, 이에 적합한 작업을 실행할 수 있습니다. 기존 GUI 자동화 모델들은 HTML이나 접근성 트리(accessibility tree)와 같은 메타데이터에 의존했지만, ShowUI는 사람처럼 시각적 입력만으로 작업을 수행합니다. ShowUI는 시각적 중복성을 줄이고, 액션 이해를 개선하며, 다양한 데이터를 효과적으로 처리하는 혁신적인 기술(예: UI 가이드 기반 비주얼 토큰 선택, 시각-언어-실행 스트리밍)을 통해 이러한 한계를 극복합니다.
기존 GUI 자동화 접근법은 HTML 같은 메타데이터에 크게 의존하여 실제 환경에서 활용이 제한됩니다. 또한, 고해상도 스크린샷은 긴 토큰 시퀀스를 생성하여 모델의 처리 능력을 초과할 수 있고, 다양한 GUI 디바이스 간의 데이터 차이로 인해 데이터 표현이 복잡해집니다. 이러한 문제를 해결하는 것은 경량, 효율적, 적응 가능한 GUI 에이전트를 구축하기 위해 매우 중요합니다.
ShowUI 모델 소개
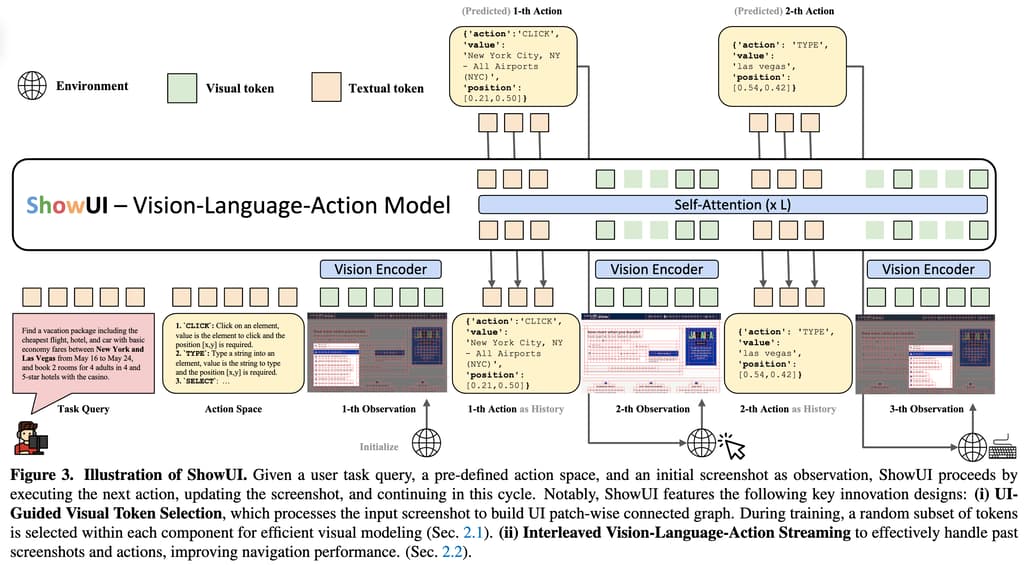
ShowUI는 GUI 자동화를 위해 설계된 비전-언어-액션(VLA) 모델로, GUI 환경에서 스크린샷을 시각적으로 분석하고, 사용자 쿼리를 이해하며, 작업을 실행하는 능력을 제공합니다. 이 모델은 다음과 같은 세 가지 주요 구성 요소를 기반으로 합니다:
UI 가이드 기반 비주얼 토큰 선택 (UI-Guided Visual Token Selection)
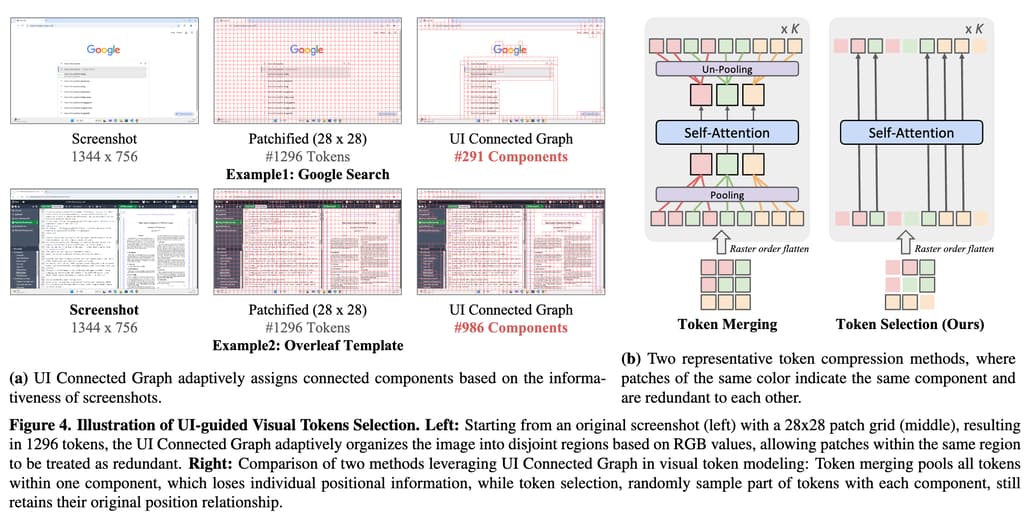
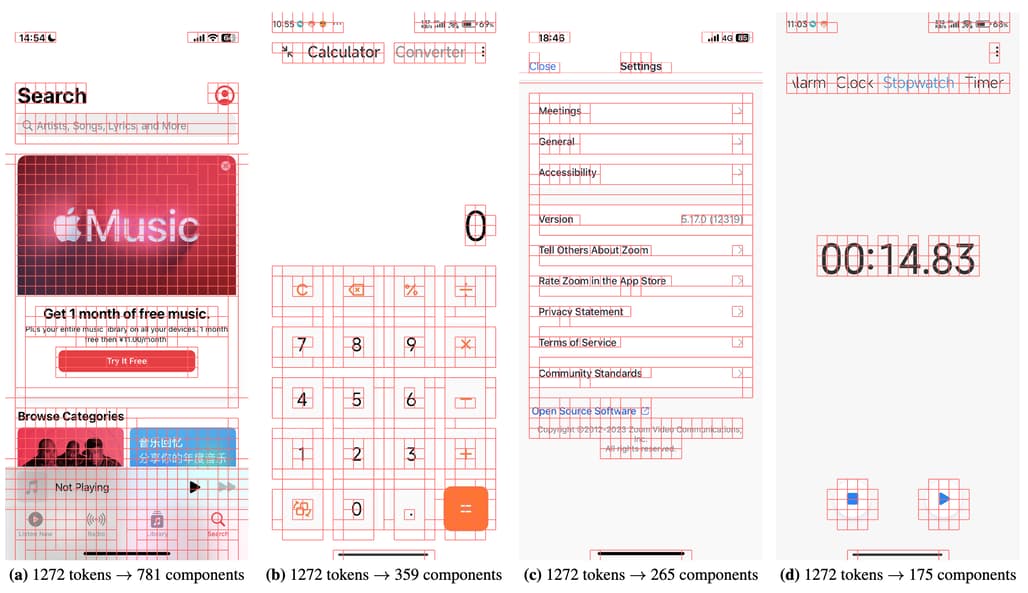
GUI 스크린샷은 자연 이미지와 달리 고도로 구조화된 시각적 요소를 가지고 있습니다. 이러한 특성을 활용하여 스크린샷을 패치(patch)로 나누고, 유사한 RGB 값을 가진 패치들을 하나의 연결된 그래프(Connected Graph)로 그룹화합니다. 이를 통해 불필요한 정보를 제거하고 핵심 정보만 처리하도록 설계되었습니다. UI 가이드 기반 시각 토큰 선택은 다음과 같이 구현됩니다:
- 패치 분할: 스크린샷을 작은 패치로 나눈 뒤, 각 패치를 노드로 간주하여 그래프를 생성합니다.
- 연결된 컴포넌트 식별: RGB 값이 유사한 패치들을 하나의 연결된 컴포넌트로 그룹화합니다. 이는 Union-Find 알고리즘을 사용해 효율적으로 수행됩니다.
- 토큰 선택: 동일한 컴포넌트 내에서 일부 패치만 무작위로 선택하여 모델의 입력 토큰 수를 줄입니다. 또한, 선택된 토큰은 원래 위치 정보를 유지하므로 시각적 컨텍스트를 잃지 않습니다.
이러한 UI 가이드 기반 비주얼 토큰 선택 방법을 통해 다음과 같은 이점을 얻을 수 있습니다:
- 33%의 시각적 토큰 감소: 학습 및 추론 단계에서 불필요한 데이터를 제거하여 계산 효율성을 크게 개선합니다.
- 학습 속도 1.4배 향상: 토큰 수 감소로 인해 트랜스포머(self-attention) 연산 부담을 줄입니다.
시각-언어-실행 스트리밍 (Interleaved Vision-Language-Action Streaming)
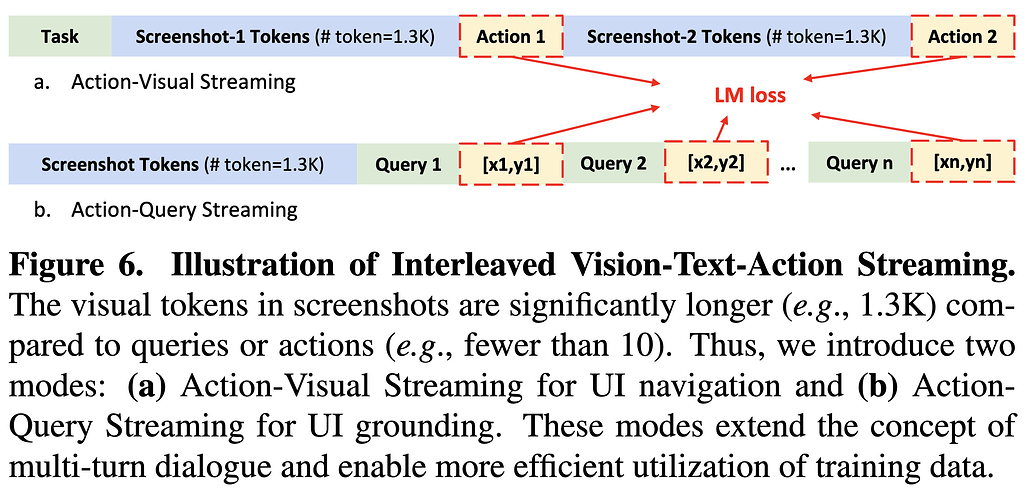
GUI 작업은 스크린샷, 언어 쿼리, 작업(action) 간의 상호작용을 필요로 합니다. ShowUI는 이 세 가지 데이터를 통합적으로 처리하기 위해 스트리밍(Streaming) 방식을 도입했습니다. 이를 통해 과거 작업과 시각적 상태를 모두 활용하여 다음 작업을 정확히 예측합니다. 이는 다음과 같이 구현됩니다:
- 작업(Action)의 JSON 포맷팅: 모든 작업을 JSON 형식으로 통일하여 플랫폼 간 일관성을 유지합니다.
- 예: { "action": "click", "value": null, "position": [0.5, 0.3] }
- 스트리밍 구조: 과거 스크린샷과 작업 기록을 교대로 입력하여 모델이 시계열 정보를 활용할 수 있도록 설계했습니다.
- 예: 스크린샷 → 액션 → 업데이트된 스크린샷 → 다음 액션 순으로 데이터가 입력됩니다.
- 멀티턴(Multi-Turn) 대화 방식: 하나의 스크린샷에서 여러 작업을 예측하도록 설계하여 데이터 효율성을 극대화했습니다.
이러한 VLA Streaming(Vision-Language-Action Streaming) 기법을 통해 GUI 환경에서 멀티스텝 네비게이션을 효과적으로 처리할 수 있으며, 작업 기록(history)을 활용하여 더 정확한 예측이 가능합니다.
고품질 GUI 데이터셋 설계 (High-Quality GUI Dataset Curation)
GUI 환경은 웹, 모바일, 데스크톱 등 다양한 디바이스에서 서로 다른 데이터 특성을 가지므로, 적절한 데이터 선별과 균형 잡힌 학습 데이터 구성이 중요합니다. 따라서 데이터 큐레이션과 샘플링을 통해 고품질 데이터셋을 획득하는 것이 중요합니다.
-
데이터 큐레이션:
- 웹: HTML에서 시각적으로 중요한 요소(예: 버튼, 체크박스)만 추출합니다.
- 모바일: 아이콘 및 기능 설명 데이터를 중심으로 수집합니다.
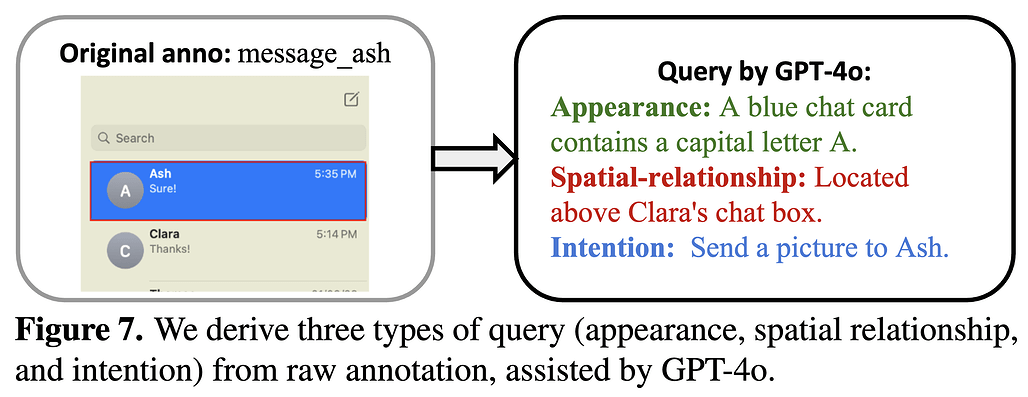
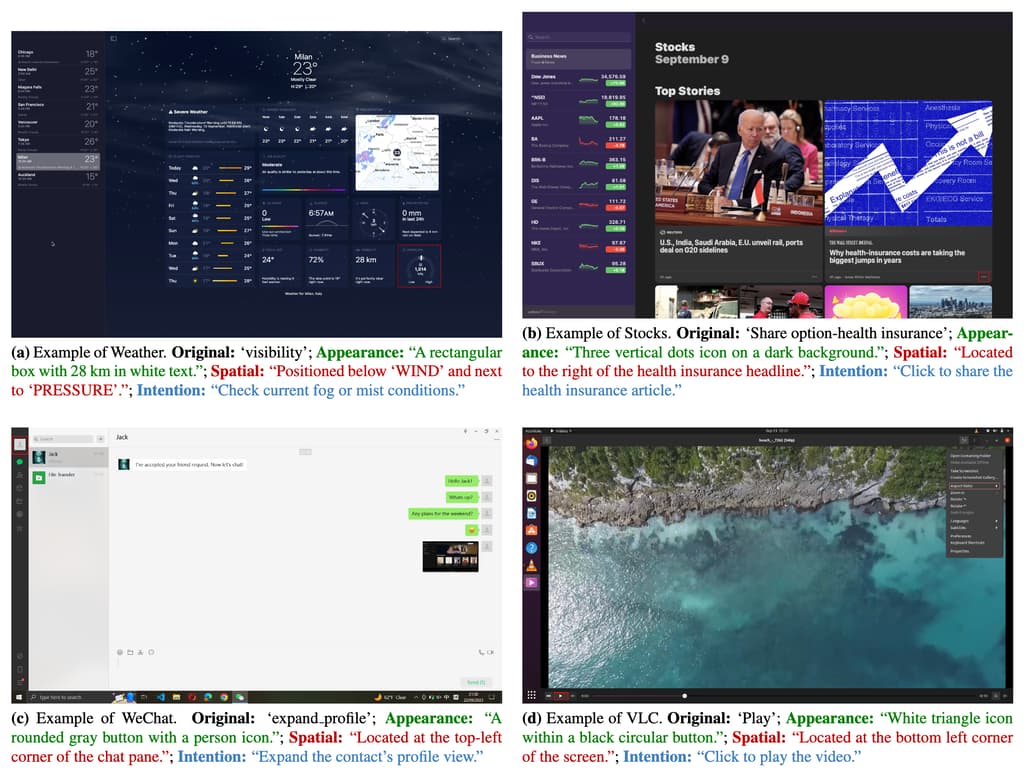
- 데스크톱: GPT-4를 사용하여 요소별로 외형, 공간적 관계, 의도를 설명하는 쿼리를 생성합니다.
-
샘플링 전략:
- 데이터 타입 간 불균형(예: 웹 데이터가 모바일 데이터보다 많음)을 해결하기 위해, 학습 배치(batch)에서 균등하게 샘플링합니다.
이를 통해 데이터셋 내의 다양한 데이터들 간의 균형을 맞춤으로써 다양한 장치(Device)에서 일관된 성능을 제공할 수 있습니다. 또한, 소규모 고품질 데이터로도 최첨단 성능을 달성합니다.
ShowUI 모델 사용법
환경 설정 및 설치, 인터페이스 실행
ShowUI 실행을 위해서는 Python 3.11 이상이 필요하며, Conda Terminal을 사용하는 것을 권장합니다. ShowUI GitHub 저장소를 복제한 뒤, 의존성을 설치하고 app.py 파일을 실행하여 인터페이스를 실행합니다.
# GitHub 저장소 복제
git clone https://github.com/showlab/ShowUI.git
cd ShowUI
# 의존성 설치
pip install -r requirements.txt
# 인터페이스 실행
python app.py
실행 후, 다음과 같이 2개의 URL을 확인할 수 있습니다(![]() 아래 PUBLIC URL은 컴퓨터를 제어할 수 있으므로 다른 사람에게 공유하지 마세요):
아래 PUBLIC URL은 컴퓨터를 제어할 수 있으므로 다른 사람에게 공유하지 마세요):
* Running on local URL:  http://127.0.0.1:7860
* Running on public URL: https://xxxxxxxxxxxxxxxx.gradio.live (Do not share this link with others, or they will be able to control your computer.)
ShowUI 모델 불러오기
다음과 같이 사전 학습된 모델을 불러옵니다:
import ast
import torch
from PIL import Image, ImageDraw
from qwen_vl_utils import process_vision_info
from transformers import Qwen2VLForConditionalGeneration, AutoTokenizer, AutoProcessor

def draw_point(image_input, point=None, radius=5):
    if isinstance(image_input, str):
        image = Image.open(BytesIO(requests.get(image_input).content)) if image_input.startswith('http') else Image.open(image_input)
    else:
        image = image_input

    if point:
        x, y = point[0] * image.width, point[1] * image.height
        ImageDraw.Draw(image).ellipse((x - radius, y - radius, x + radius, y + radius), fill='red')
    display(image)
    return

model = Qwen2VLForConditionalGeneration.from_pretrained(
    "showlab/ShowUI-2B",
    torch_dtype=torch.bfloat16,
    device_map="auto"
)

min_pixels = 256*28*28
max_pixels = 1344*28*28

processor = AutoProcessor.from_pretrained("Qwen/Qwen2-VL-2B-Instruct", min_pixels=min_pixels, max_pixels=max_pixels)
UI Grounding
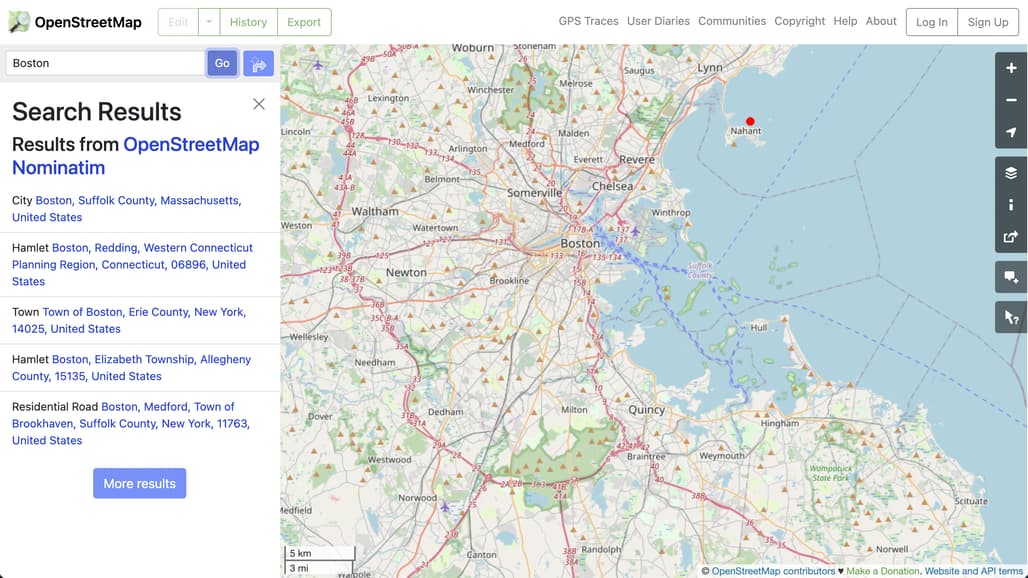
img_url = 'examples/web_dbd7514b-9ca3-40cd-b09a-990f7b955da1.png'
query = "Nahant"


_SYSTEM = "Based on the screenshot of the page, I give a text description and you give its corresponding location. The coordinate represents a clickable location [x, y] for an element, which is a relative coordinate on the screenshot, scaled from 0 to 1."
messages = [
    {
        "role": "user",
        "content": [
            {"type": "text", "text": _SYSTEM},
            {"type": "image", "image": img_url, "min_pixels": min_pixels, "max_pixels": max_pixels},
            {"type": "text", "text": query}
        ],
    }
]

text = processor.apply_chat_template(
    messages, tokenize=False, add_generation_prompt=True,
)
image_inputs, video_inputs = process_vision_info(messages)
inputs = processor(
    text=[text],
    images=image_inputs,
    videos=video_inputs,
    padding=True,
    return_tensors="pt",
)
inputs = inputs.to("cuda")

generated_ids = model.generate(**inputs, max_new_tokens=128)
generated_ids_trimmed = [
    out_ids[len(in_ids) :] for in_ids, out_ids in zip(inputs.input_ids, generated_ids)
]
output_text = processor.batch_decode(
    generated_ids_trimmed, skip_special_tokens=True, clean_up_tokenization_spaces=False
)[0]

click_xy = ast.literal_eval(output_text)
# [0.73, 0.21]

draw_point(img_url, click_xy, 10)
이렇게 하면 다음과 같이 결과가 나타납니다(붉은 점이 있는 곳이 click_xy의 [x, y] 좌표입니다.):
UI Navigation
다음과 같이 시스템 프롬프트를 지정합니다:
# 시스템 프롬프트: 당신은 {_APP} 화면을 탐색하도록 훈련된 어시스턴트입니다.  작업 명령, 화면 관찰, 동작 기록 시퀀스가 주어집니다,  다음 동작을 출력하고 다음 관찰을 기다립니다.  다음은 작업 공간입니다: {_ACTION_SPACE}
_NAV_SYSTEM = """You are an assistant trained to navigate the {_APP} screen.
Given a task instruction, a screen observation, and an action history sequence,
output the next action and wait for the next observation.
Here is the action space:
{_ACTION_SPACE}
"""

# 포맷: 다음 키들을 갖는 액션들을 dict로 지정합니다: {...} 값이나 위치가 적용되지 않는 경우 `None`으로 설정합니다. 액션에 시작 및 종료 위치가 필요한 경우 위치는 [[x1,y1], [x2,y2]]가 될 수 있습니다. 위치는 스크린샷의 상대 좌표를 나타내며 0-1 범위로 스케일링해야 합니다.
_NAV_FORMAT = """
Format the action as a dictionary with the following keys:
{'action': 'ACTION_TYPE', 'value': 'element', 'position': [x,y]}

If value or position is not applicable, set it as `None`.
Position might be [[x1,y1], [x2,y2]] if the action requires a start and end position.
Position represents the relative coordinates on the screenshot and should be scaled to a range of 0-1.
"""

action_map = {
'web': """
1. `CLICK`: Click on an element, value is not applicable and the position [x,y] is required.
2. `INPUT`: Type a string into an element, value is a string to type and the position [x,y] is required.
3. `SELECT`: Select a value for an element, value is not applicable and the position [x,y] is required.
4. `HOVER`: Hover on an element, value is not applicable and the position [x,y] is required.
5. `ANSWER`: Answer the question, value is the answer and the position is not applicable.
6. `ENTER`: Enter operation, value and position are not applicable.
7. `SCROLL`: Scroll the screen, value is the direction to scroll and the position is not applicable.
8. `SELECT_TEXT`: Select some text content, value is not applicable and position [[x1,y1], [x2,y2]] is the start and end position of the select operation.
9. `COPY`: Copy the text, value is the text to copy and the position is not applicable.
""",

'phone': """
1. `INPUT`: Type a string into an element, value is not applicable and the position [x,y] is required.
2. `SWIPE`: Swipe the screen, value is not applicable and the position [[x1,y1], [x2,y2]] is the start and end position of the swipe operation.
3. `TAP`: Tap on an element, value is not applicable and the position [x,y] is required.
4. `ANSWER`: Answer the question, value is the status (e.g., 'task complete') and the position is not applicable.
5. `ENTER`: Enter operation, value and position are not applicable.
"""
}

_NAV_USER = """{system}
Task: {task}
Observation: <|image_1|>
Action History: {action_history}
What is the next action?
"""
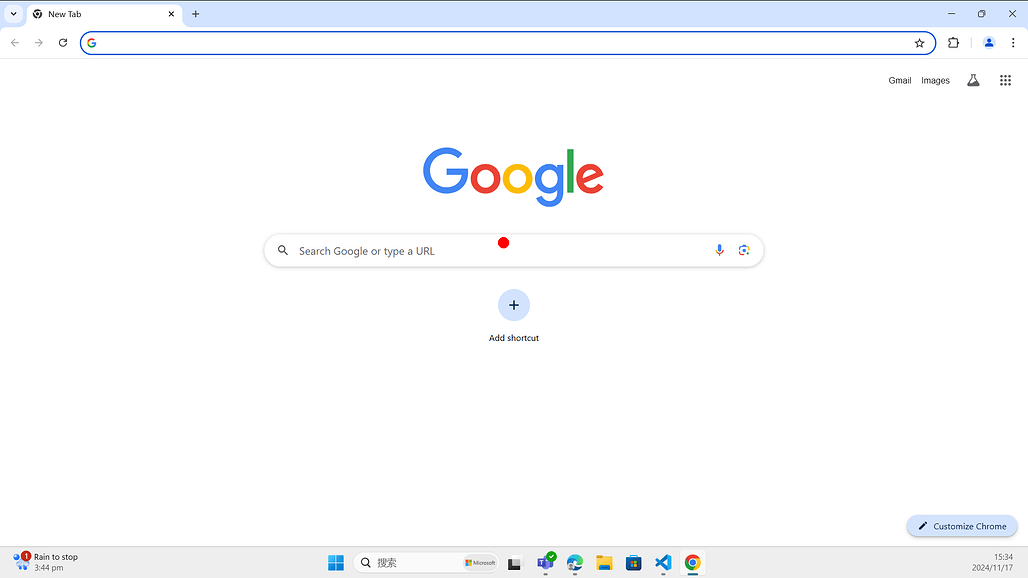
Chrome 예시 이미지를 입력하고 프롬프트를 입력하여 동작을 확인합니다:
img_url = 'examples/chrome.png'
split='web'
system_prompt = _NAV_SYSTEM.format(_APP=split, _ACTION_SPACE=action_map[split])
query = "Search the weather for the New York city."

messages = [
    {
        "role": "user",
        "content": [
            {"type": "text", "text": system_prompt},
            {"type": "image", "image": img_url, "min_pixels": min_pixels, "max_pixels": max_pixels},
            {"type": "text", "text": query}
        ],
    }
]

text = processor.apply_chat_template(
    messages, tokenize=False, add_generation_prompt=True,
)
image_inputs, video_inputs = process_vision_info(messages)
inputs = processor(
    text=[text],
    images=image_inputs,
    videos=video_inputs,
    padding=True,
    return_tensors="pt",
)
inputs = inputs.to("cuda")

generated_ids = model.generate(**inputs, max_new_tokens=128)
generated_ids_trimmed = [
    out_ids[len(in_ids) :] for in_ids, out_ids in zip(inputs.input_ids, generated_ids)
]
output_text = processor.batch_decode(
    generated_ids_trimmed, skip_special_tokens=True, clean_up_tokenization_spaces=False
)[0]

print(output_text)
# {'action': 'CLICK', 'value': None, 'position': [0.49, 0.42]},
# {'action': 'INPUT', 'value': 'weather for New York city', 'position': [0.49, 0.42]},
# {'action': 'ENTER', 'value': None, 'position': None}
 ShowUI 실행 데모
 ShowUI: One Vision-Language-Action Model for GUI Visual Agent 논문
 ShowUI-2B 모델
 ShowUI GitHub 저장소
 ShowUI Desktop 데이터셋
이 글은 GPT 모델로 정리한 글을 바탕으로 한 것으로, 원문의 내용 또는 의도와 다르게 정리된 내용이 있을 수 있습니다. 관심있는 내용이시라면 원문도 함께 참고해주세요! 읽으시면서 어색하거나 잘못된 내용을 발견하시면 덧글로 알려주시기를 부탁드립니다. ![]()
파이토치 한국 사용자 모임
![]() 이 정리한 이 글이 유용하셨나요? 회원으로 가입하시면 주요 글들을 이메일
이 정리한 이 글이 유용하셨나요? 회원으로 가입하시면 주요 글들을 이메일![]() 로 보내드립니다! (기본은 Weekly지만 Daily로 변경도 가능합니다.)
로 보내드립니다! (기본은 Weekly지만 Daily로 변경도 가능합니다.)
![]() 아래
아래![]() 쪽에 좋아요
쪽에 좋아요![]() 를 눌러주시면 새로운 소식들을 정리하고 공유하는데 힘이 됩니다~
를 눌러주시면 새로운 소식들을 정리하고 공유하는데 힘이 됩니다~ ![]()
