- Enterprise-grade Private Model-as-a-Service Platform, Neutree 블로그를 허락 하에 번역하였습니다.
- Neutree는 Enterprise Cloud Infra 기업 Arcfra에서 제공하고 있으며, 오픈소스로 공개되어 있습니다.
- Neutree의 원문 블로그는 아래 링크에서 확인 가능합니다. Neutree 소개 글은 여기에서 보실 수 있습니다.
LLM 추론 엔진 이해하기: Nano-vLLM 내부 살펴보기 (1부)
Understanding LLM Inference Engines: Inside Nano-vLLM (Part 1)
아키텍처, 스케줄링, 그리고 프롬프트에서 토큰까지 / Architecture, Scheduling, and the Path from Prompt to Token
LLM을 프로덕션에 배포할 때 추론 엔진은 핵심 인프라가 됩니다. OpenAI, Claude, DeepSeek 등 우리가 사용하는 모든 LLM API는 이런 추론 엔진 위에서 동작합니다. 대부분의 개발자는 고수준 API를 통해 LLM과 상호작용하지만, 그 내부—프롬프트(Prompt)가 어떻게 처리되고, 요청이 어떻게 함께 처리(Batch)되며, GPU 리소스가 어떻게 관리되는지—를 이해하면 시스템 설계를 결정하는데 큰 도움이 됩니다.
When deploying large language models in production, the inference engine becomes a critical piece of infrastructure. Every LLM API you use — OpenAI, Claude, DeepSeek — is sitting on top of an inference engine like this. While most developers interact with LLMs through high-level APIs, understanding what happens beneath the surface—how prompts are processed, how requests are batched, and how GPU resources are managed—can significantly impact system design decisions.
이 2부작 글은 Nano-vLLM을 통해 추론 엔진의 내부를 살펴봅니다. Nano-vLLM은 약 1,200줄 이하의 Python 코드로 이루어진 작은 구현체이지만, 가장 널리 사용되는 오픈소스 추론 엔진 중 하나인 vLLM의 핵심 아이디어를 담고 있습니다.
This two-part series explores these internals through Nano-vLLM, a minimal (~1,200 lines of Python) yet production-grade implementation that distills the core ideas behind vLLM, one of the most widely adopted open-source inference engines.
Nano-vLLM은 DeepSeek-V3, R1 등의 기술 보고서에 이름을 올린 DeepSeek 기여자가 만들었습니다. 최소한의 코드베이스임에도 불구하고, vLLM을 프로덕션 수준으로 만드는 핵심 기능들인 프리픽스 캐싱(prefix caching), 텐서 병렬화(tensor parallelism), CUDA 그래프 컴파일(CUDA Graph Compile), torch 컴파일 최적화 등을 모두 구현하고 있습니다. 벤치마크에서는 Nano-vLLM은 전체 vLLM 구현체와 동등하거나 약간 앞서는 처리량(throughput)을 보여줍니다. Nano-vLLM은 수십 가지 모델 아키텍처와 하드웨어 백엔드를 지원하는 복잡성에 압도되지 않으면서, 추론 엔진의 설계를 들여다보는 이상적인 창(窓)이 됩니다.
Nano-vLLM was created by a contributor to DeepSeek, whose name appears on the technical reports of models like DeepSeek-V3 and R1. Despite its minimal codebase, it implements the essential features that make vLLM production-ready: prefix caching, tensor parallelism, CUDA graph compilation, and torch compilation optimizations. Benchmarks show it achieving throughput comparable to—or even slightly exceeding—the full vLLM implementation. This makes it an ideal lens for understanding inference engine design without getting lost in the complexity of supporting dozens of model architectures and hardware backends.
1부(이번 글)에서는 엔지니어링 아키텍처에 집중합니다: 시스템이 어떻게 구성되어 있는지, 요청이 파이프라인을 따라 어떻게 처리되는지, 스케줄링 결정이 어떻게 이루어지는지 등을 살펴봅니다. 여기에서는 실제 모델 연산은 일단 블랙박스로 취급하겠습니다. 이후, 2부에서 그 상자를 열어 어텐션(attention) 메커니즘, KV 캐시 내부, 연산 수준의 텐서 병렬화에 대해서 살펴보도록 하겠습니다.
In Part 1, we focus on the engineering architecture: how the system is organized, how requests flow through the pipeline, and how scheduling decisions are made. We will treat the actual model computation as a black box for now—Part 2 will open that box to explore attention mechanisms, KV cache internals, and tensor parallelism at the computation level.
전체 흐름: 프롬프트에서 출력까지 / The Main Flow: From Prompt to Output
Nano-vLLM의 진입점은 단순합니다: generate 메서드를 가진 LLM 클래스입니다. 프롬프트 배열과 샘플링 매개변수를 전달하면 생성된 텍스트가 반환됩니다. 하지만 이러한 단순한 인터페이스 뒤에는 텍스트를 토큰으로 변환하고, 연산을 효율적으로 스케줄링하며, GPU 리소스를 관리하는 정교하게 설계된 파이프라인이 존재합니다.
The entry point to Nano-vLLM is straightforward: an
LLMclass with ageneratemethod. You pass in an array of prompts and sampling parameters, and get back the generated text. But behind this simple interface lies a carefully designed pipeline that transforms text into tokens, schedules computation efficiently, and manages GPU resources.

프롬프트에서 시퀀스로 / From Prompts to Sequences
generate가 호출되면, 각 프롬프트 문자열은 토크나이저(tokenizer)를 거치게 됩니다. 토크나이저는 자연어를 LLM이 처리하는 기본 단위인 토큰(token)으로 분할하는, 모델에 특화된 컴포넌트입니다. 모델 종류(Qwen, LLaMA, DeepSeek)마다 서로 다른 토크나이저를 사용하기 때문에, 동일한 길이의 프롬프트도 모델에 따라 다른 수의 토큰으로 변환(produce)될 수 있습니다. 토크나이저는 각 프롬프트를 시퀀스(sequence) 로 변환합니다: 시퀀스는 가변적인 길이를 갖는 토큰 ID의 배열을 나타내는 내부 데이터 구조입니다. 이 시퀀스는 향후 시스템 전체를 관통하는 핵심적인 작업 단위(Core Unit of Work)가 됩니다.
When
generateis called, each prompt string goes through a tokenizer—a model-specific component that splits natural language into tokens, the fundamental units that LLMs process. Different model families (Qwen, LLaMA, DeepSeek) use different tokenizers, which is why a prompt of the same length may produce different token counts across models. The tokenizer converts each prompt into a sequence: an internal data structure representing a variable-length array of token IDs. This sequence becomes the core unit of work flowing through the rest of the system.
생산자-소비자 패턴 / The Producer-Consumer Pattern
여기서 아키텍처가 흥미로워집니다. 각 시퀀스를 즉시 처리하는 대신, Nano-vLLM 시스템은 Scheduler를 중심으로 하는 생산자-소비자 패턴(Producer-Consumer Pattern)을 채택하였습니다. add_request 메서드가 프롬프트를 시퀀스로 변환하여 Scheduler의 큐에 넣는 생산자 역할을 합니다. 한편, 별도의 단계 루프(Step Loop) 가 Scheduler에서 시퀀스 배치를 꺼내 처리하는 소비자 역할을 수행합니다. 이러한 분리된 구조(decoupling)가 핵심입니다—여러 시퀀스를 합쳐서(accumulate multiple sequences) 함께 처리할 수 있게 해주며, 바로 이 부분에서 성능 향상이 이루어집니다.
Here's where the architecture gets interesting. Rather than processing each sequence immediately, the system adopts a producer-consumer pattern with the Scheduler at its center. The
add_requestmethod acts as the producer: it converts prompts to sequences and places them into the Scheduler's queue. Meanwhile, a separate step loop acts as the consumer, pulling batches of sequences from the Scheduler for processing. This decoupling is key—it allows the system to accumulate multiple sequences and process them together, which is where the performance gains come from.
배치 처리와 처리량-지연 시간 트레이드-오프 / Batching and the Throughput-Latency Trade-off
배치 처리가 왜 중요할까요? GPU 연산에는 CUDA 커널 초기화, CPU와 GPU 메모리 간 데이터 전송, 결과 동기화 등, 상당한 고정적인 오버헤드(Significant Fixed Overhead)가 존재합니다. 시퀀스를 하나씩 처리하면 모든 요청마다 이러한 오버헤드가 발생합니다. 하지만 여러 시퀀스를 묶어 처리하면, 이러한 오버헤드를 많은 요청들에 걸쳐 분산시킬 수 있어, 전체 처리량을 크게 향상시킬 수 있습니다.
Why does batching matter? GPU computation has significant fixed overhead—initializing CUDA kernels, transferring data between CPU and GPU memory, and synchronizing results. If you process one sequence at a time, you pay this overhead for every single request. By batching multiple sequences together, you amortize this overhead across many requests, dramatically improving overall throughput.
하지만 배치 처리에는 트레이드-오프(Trade-off)가 있습니다. 만약 3개의 프롬프트가 배치로 묶이면, 모든 처리가 완료된 후에 결과가 반환됩니다. 배치 처리에 걸리는 전체 시간은 가장 느린 시퀀스에 의해 결정됩니다. 즉, 배치 크기가 클수록 처리량은 높아지지만 개별 요청의 지연 시간(latency)은 길어질 수 있고, 배치 크기가 작을수록 지연 시간은 줄지만 처리량은 감소합니다. 이는 추론 엔진 설계의 핵심적인 딜레마(Fundamental Tension)이며, 사용자는 배치 크기 매개변수를 설정함으로써 이 트레이드-오프를 직접적으로 제어합니다.
However, batching comes with a trade-off. When three prompts are batched together, each must wait for the others to complete before any results are returned. The total time for the batch is determined by the slowest sequence. This means: larger batches yield higher throughput but potentially higher latency for individual requests; smaller batches yield lower latency but reduced throughput. This is a fundamental tension in inference engine design, and the batch size parameters you configure directly control this trade-off.
프리필 vs. 디코드: 생성의 두 단계 / Prefill vs. Decode: Two Phases of Generation
Scheduler를 살펴보기 전에, 중요한 구분을 이해해야 합니다. LLM 추론은 두 단계로 이루어집니다:
Before diving into the Scheduler, we need to understand a crucial distinction. LLM inference happens in two phases:
- 프리필(Prefill): 입력 프롬프트를 처리하는 단계입니다. 모든 입력 토큰을 처리하며 모델의 내부 상태를 구성합니다. 이 단계에서 사용자에게는 아무것도 보이지 않습니다.
Prefill: Processing the input prompt. All input tokens are processed together to build up the model's internal state. During this phase, the user sees nothing.
- 디코드(Decode): 출력 토큰을 생성하는 단계입니다. 모델은 이전 모든 토큰에 의존하여 한 번에 토큰 하나씩 생성합니다. 텍스트가 스트리밍되어 나오는 단계입니다.
Decode: Generating output tokens. The model produces one token at a time, each depending on all previous tokens. This is when you see text streaming out.
하나의 시퀀스에는 정확히 하나의 프리필 단계가 있고, 이후 많은 디코드 단계들이 따릅니다. Scheduler는 이 두 단계를 구분해야 합니다—프리필은 한 번에 많은 토큰을 처리하는 반면, 디코드는 스텝당 토큰 하나만 처리하는 등 연산 특성이 매우 다르기 때문입니다.
For a single sequence, there is exactly one prefill phase followed by many decode steps. The Scheduler needs to distinguish between these phases because they have very different computational characteristics—prefill processes many tokens at once, while decode processes just one token per step.
Scheduler 내부 / Inside the Scheduler
Scheduler는 어떤 시퀀스를 어떤 순서로 처리할지 결정하는 역할을 하며, 두 개의 큐(Queue)를 관리합니다:
The Scheduler is responsible for deciding which sequences to process and in what order. It maintains two queues:
대기 큐와 실행 큐 / Waiting and Running Queues
- 대기 큐(Waiting Queue): 대기 큐에는 (요청이) 제출되었지만 아직 (처리가) 시작되지 않은 시퀀스들이 있습니다.
add_request로 들어오는 새 시퀀스는 항상 대기 큐에 먼저 들어옵니다.Waiting Queue: Sequences that have been submitted but not yet started. New sequences from
add_requestalways enter here first. - 실행 큐(Running Queue): 실행 큐에는 프리필 또는 디코드 단계에서 활발하게 처리 중인 시퀀스들이 있습니다.
Running Queue: Sequences that are actively being processed—either in prefill or decode phase.
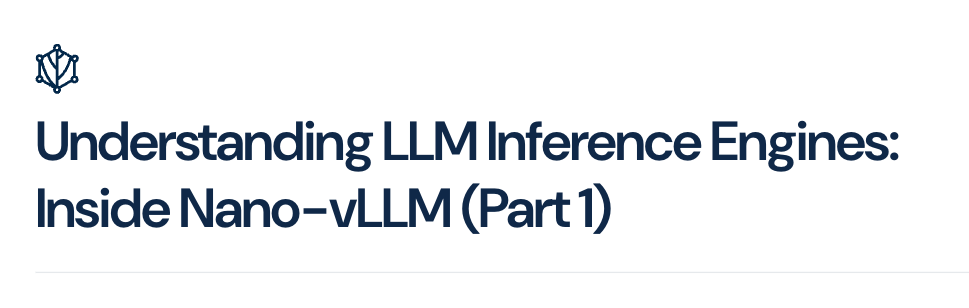
시퀀스가 대기 큐에 들어오면, Scheduler는 Block Manager라는 다른 컴포넌트에 리소스 할당을 요청합니다. 할당이 완료되면 시퀀스는 실행 큐로 이동합니다. 이후, Scheduler는 실행 큐에서 시퀀스를 선택하여 다음 연산 단계를 위한 배치로 묶고, 동작 유형(프리필 또는 디코드)과 함께 전달합니다.
When a sequence enters the Waiting queue, the Scheduler checks with another component called the Block Manager to allocate resources for it. Once allocated, the sequence moves to the Running queue. The Scheduler then selects sequences from the Running queue for the next computation step, grouping them into a batch along with an action indicator (prefill or decode).
리소스 고갈 처리 / Handling Resource Exhaustion
GPU 메모리가 가득 차면 어떻게 될까요? 중간 연산 결과를 저장하는 KV 캐시(KV Cache)는 용량이 제한되어 있습니다. 실행 큐의 시퀀스가 다음 토큰의 캐시를 저장할 공간이 없어 계속 진행할 수 없는 경우, Scheduler는 해당 시퀀스를 선점(preempt) 하여, 대기 큐의 맨 앞으로 보내게 됩니다. 이를 통해 리소스가 확보되는 즉시 시퀀스가 재개될 수 있도록 하면서, 다른 시퀀스들이 진행을 계속할 수 있게 합니다.
What happens when GPU memory fills up? The KV cache (which stores intermediate computation results) has limited capacity. If a sequence in the Running queue cannot continue because there's no room to store its next token's cache, the Scheduler preempts it—moving it back to the front of the Waiting queue. This ensures the sequence will resume as soon as resources free up, while allowing other sequences to make progress.
해당 시퀀스가 종료 토큰이나 최대 길이에 도달하여 처리가 완료되면, Scheduler는 그 시퀀스를 실행 큐에서 제거하고 리소스를 해제하여 대기 중인 시퀀스를 위해 (메모리) 공간을 확보합니다.
When a sequence completes (reaches an end-of-sequence token or maximum length), the Scheduler removes it from the Running queue and deallocates its resources, freeing space for waiting sequences.
Block Manager: KV 캐시 제어 플레인 / The Block Manager: KV Cache Control Plane
Block Manager에는 vLLM의 메모리 관리 혁신이 있습니다. 이를 이해하기 위해, 먼저 새로운 리소스 단위인 블록(block) 을 살펴보겠습니다.
The Block Manager is where vLLM's memory management innovation lives. To understand it, we first need to introduce a new resource unit: the block.
시퀀스에서 블록으로 / From Sequences to Blocks
시퀀스는 가변 길이의 토큰 배열입니다—10개일 수도 있고 10,000개일 수도 있습니다. 하지만 이러한 가변 길이 할당은 GPU 메모리 관리 측면에서는 비효율적입니다. Block Manager는 시퀀스를 고정된 크기(기본값: 256 토큰씩)의 블록들로 나누어 이를 해결합니다.
A sequence is a variable-length array of tokens—it can be 10 tokens or 10,000. But variable-length allocations are inefficient for GPU memory management. The Block Manager solves this by dividing sequences into fixed-size blocks (default: 256 tokens each).
700-토큰짜리 시퀀스는 세 개의 블록을 차지합니다: 두 개의 꽉 찬 블록(각 256 토큰)과 하나의 부분 블록(188 토큰, 68 슬롯 미사용). 여기서 중요한 점은, 서로 다른 시퀀스의 토큰들은 절대 블록을 공유하지 않습니다—하지만 하나의 긴 시퀀스는 여러 블록에 걸쳐져 있을 수 있습니다.
A 700-token sequence would occupy three blocks: two full blocks (256 tokens each) and one partial block (188 tokens, with 68 slots unused). Importantly, tokens from different sequences never share a block—but a long sequence will span multiple blocks.
해싱을 통한 프리픽스 캐싱 / Prefix Caching via Hashing
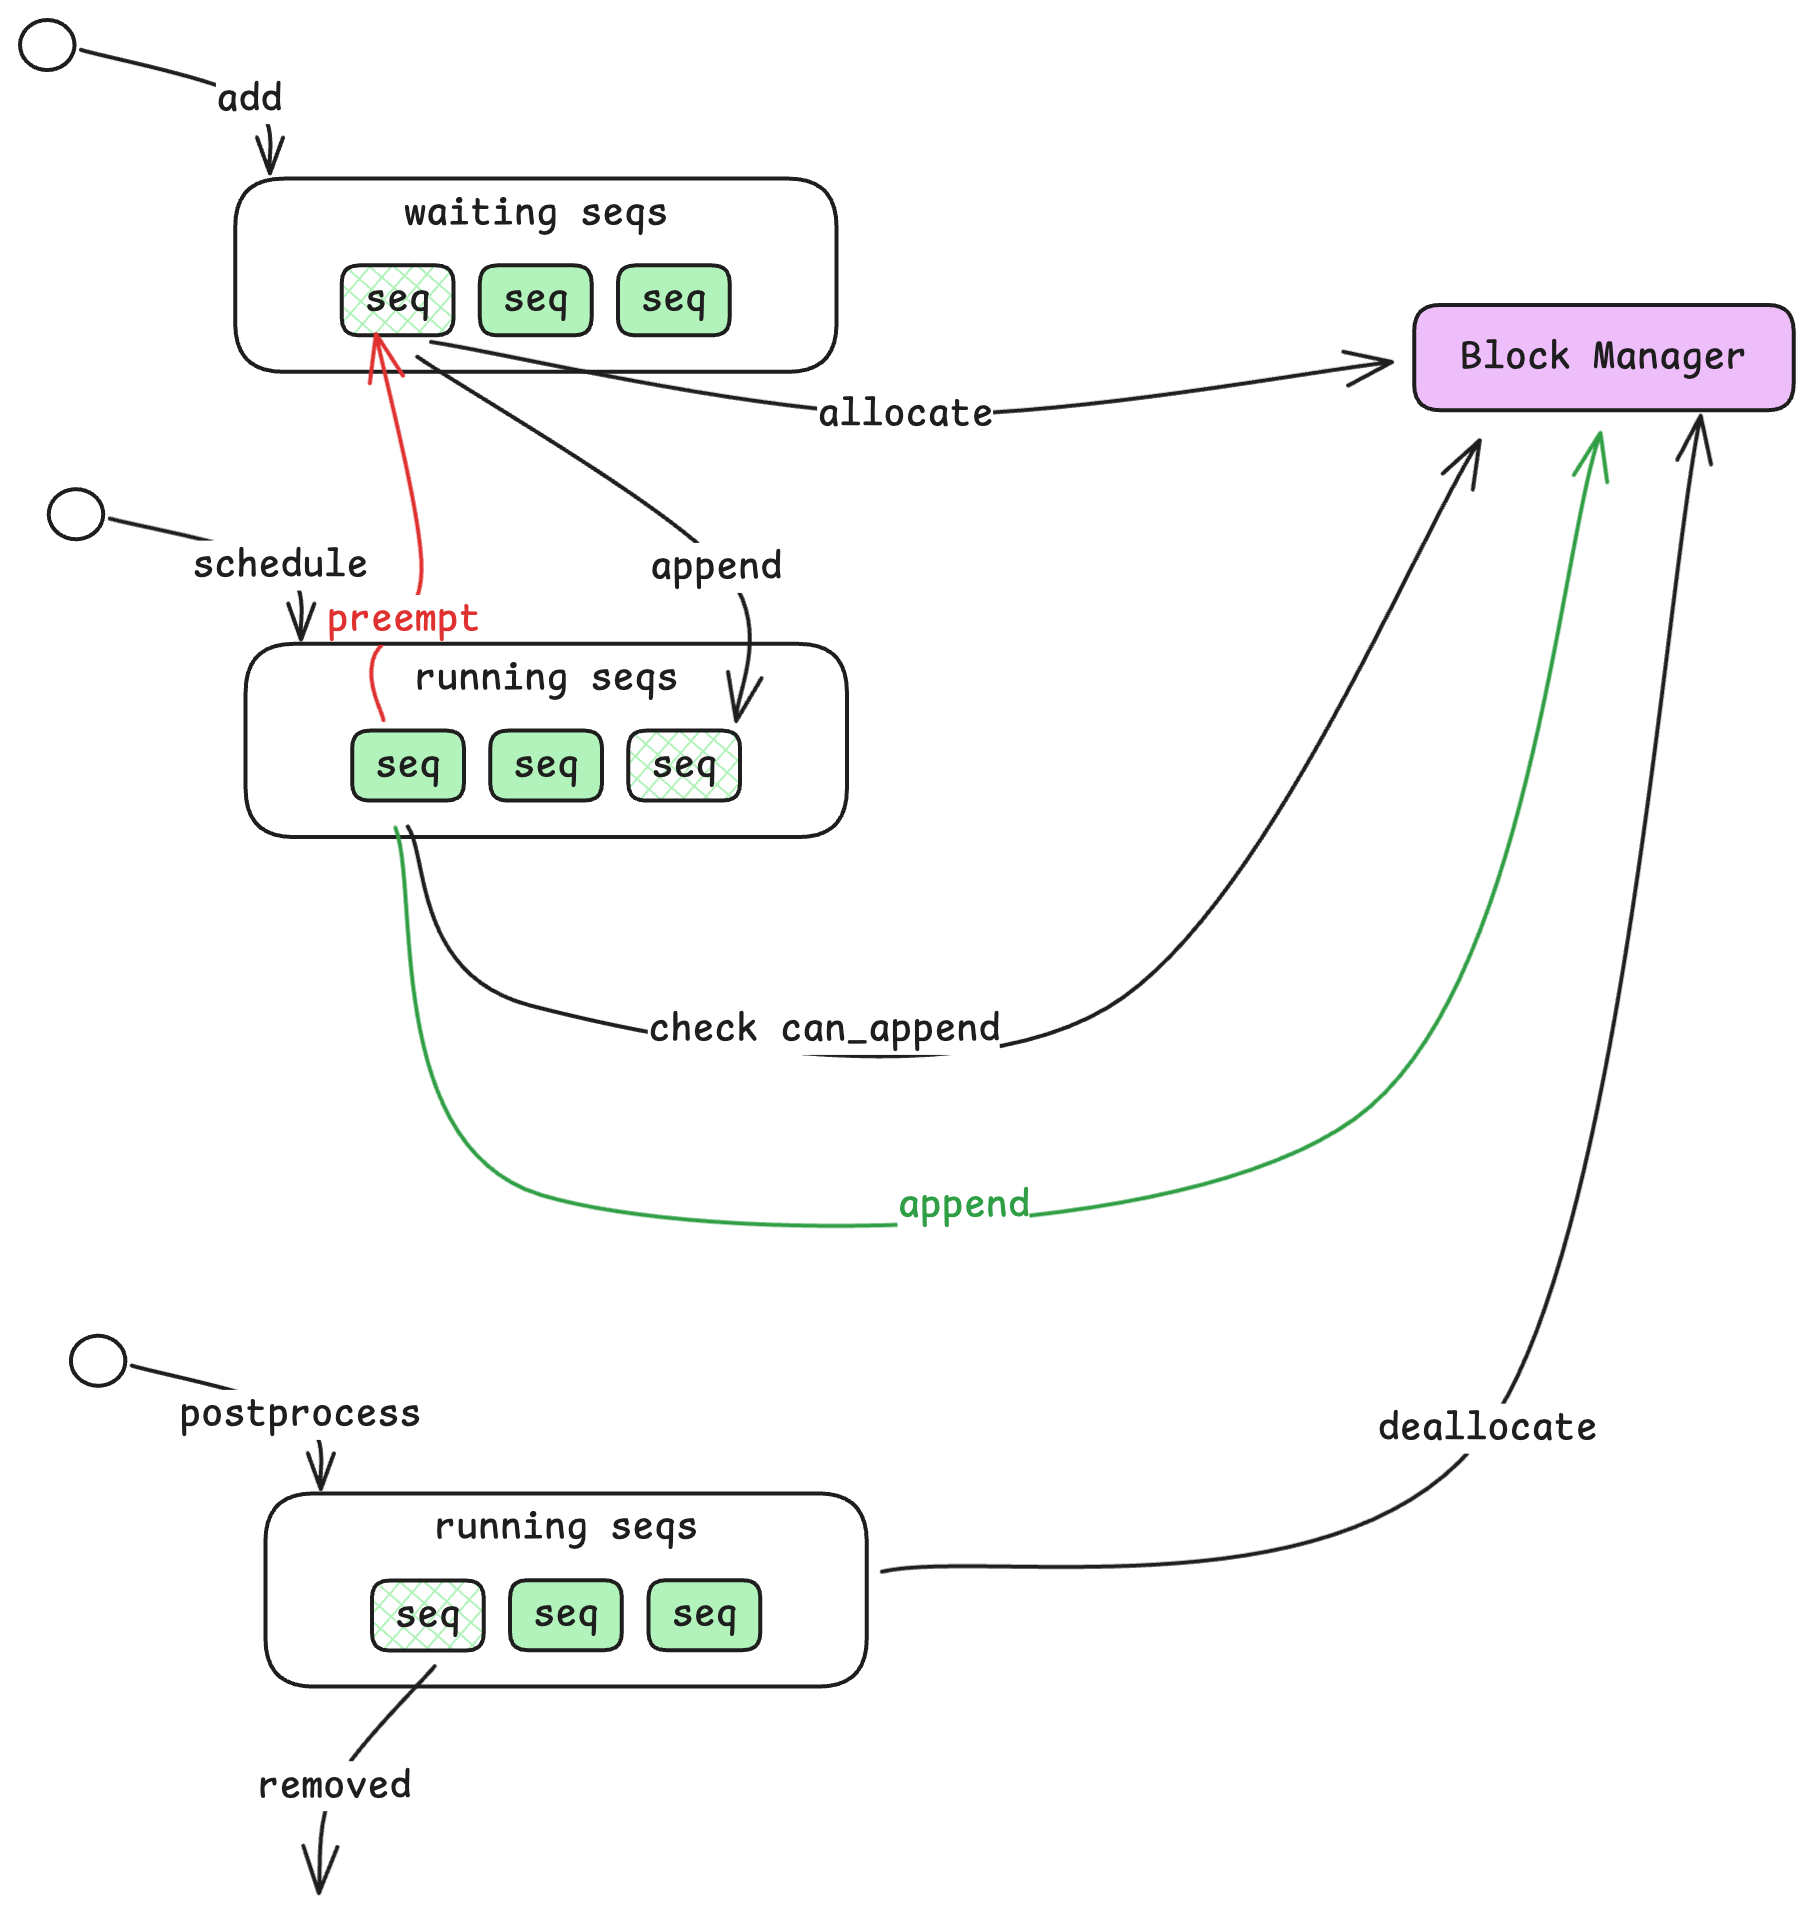
여기서 뛰어난 부분이 나옵니다. 각 블록의 내용은 해시(hash)된 후, Block Manager는 해시별-블록ID(Hash-to-Block-ID)로의 매핑(mapping)을 유지합니다. 새로운 시퀀스가 도착하면, 시스템은 해당 블록들의 해시를 계산한 뒤, 이미 캐시에 존재하는지 확인합니다.
Here's where it gets clever. Each block's content is hashed, and the Block Manager maintains a hash-to-block-id mapping. When a new sequence arrives, the system computes hashes for its blocks and checks if any already exist in the cache.
동일한 해시를 가진 블록이 존재하면, 시스템은 참조 카운트(Reference Count)를 증가시켜 재사용합니다—중복 연산이나 저장이 필요 없습니다. 이는 채팅 애플리케이션의 시스템 프롬프트와 같이 많은 요청들이 공통된 접두어(prefix)를 공유하는 시나리오에서 특히 강력합니다. 이러한 접두어(prefix)는 한 번만 계산하면 되고, 이후 요청들은 캐시된 결과를 재사용할 수 있습니다.
If a block with the same hash exists, the system reuses it by incrementing a reference count—no redundant computation or storage needed. This is particularly powerful for scenarios where many requests share common prefixes (like system prompts in chat applications). The prefix only needs to be computed once; subsequent requests can reuse the cached results.
제어 플레인 vs. 데이터 플레인 / Control Plane vs. Data Plane
미묘하지만 중요한 점: Block Manager는 CPU 메모리에 위치하며, 어떤 블록이 할당되었는지, 참조 카운트, 해시 매핑 등과 같은 메타데이터(metadata) 만 추적합니다. 실제 KV 캐시의 데이터는 GPU에 있습니다. Block Manager가 제어 플레인(Control Plane) 이며, GPU 메모리가 데이터 플레인(Data Plane) 입니다. 이러한 분리를 통해 실제 연산이 발생하기 전까지 GPU 메모리를 건드리지 않으면서도 빠르게 할당 결정을 내릴 수 있습니다.
A subtle but important point: the Block Manager lives in CPU memory and only tracks metadata—which blocks are allocated, their reference counts, and hash mappings. The actual KV cache data lives on the GPU. The Block Manager is the control plane; the GPU memory is the data plane. This separation allows fast allocation decisions without touching GPU memory until actual computation happens.
블록이 해제될 때, Block Manager는 즉시 해당 블록을 사용 가능으로 표시하지만 GPU 메모리는 초기화되지 않습니다—이는 블록이 재사용될 때 단순히 덮어씌워집니다. 이로써 불필요한 메모리 연산을 피할 수 있습니다.
When blocks are deallocated, the Block Manager marks them as free immediately, but the GPU memory isn't zeroed—it's simply overwritten when the block is reused. This avoids unnecessary memory operations.
Model Runner: 실행과 병렬화 / The Model Runner: Execution and Parallelism
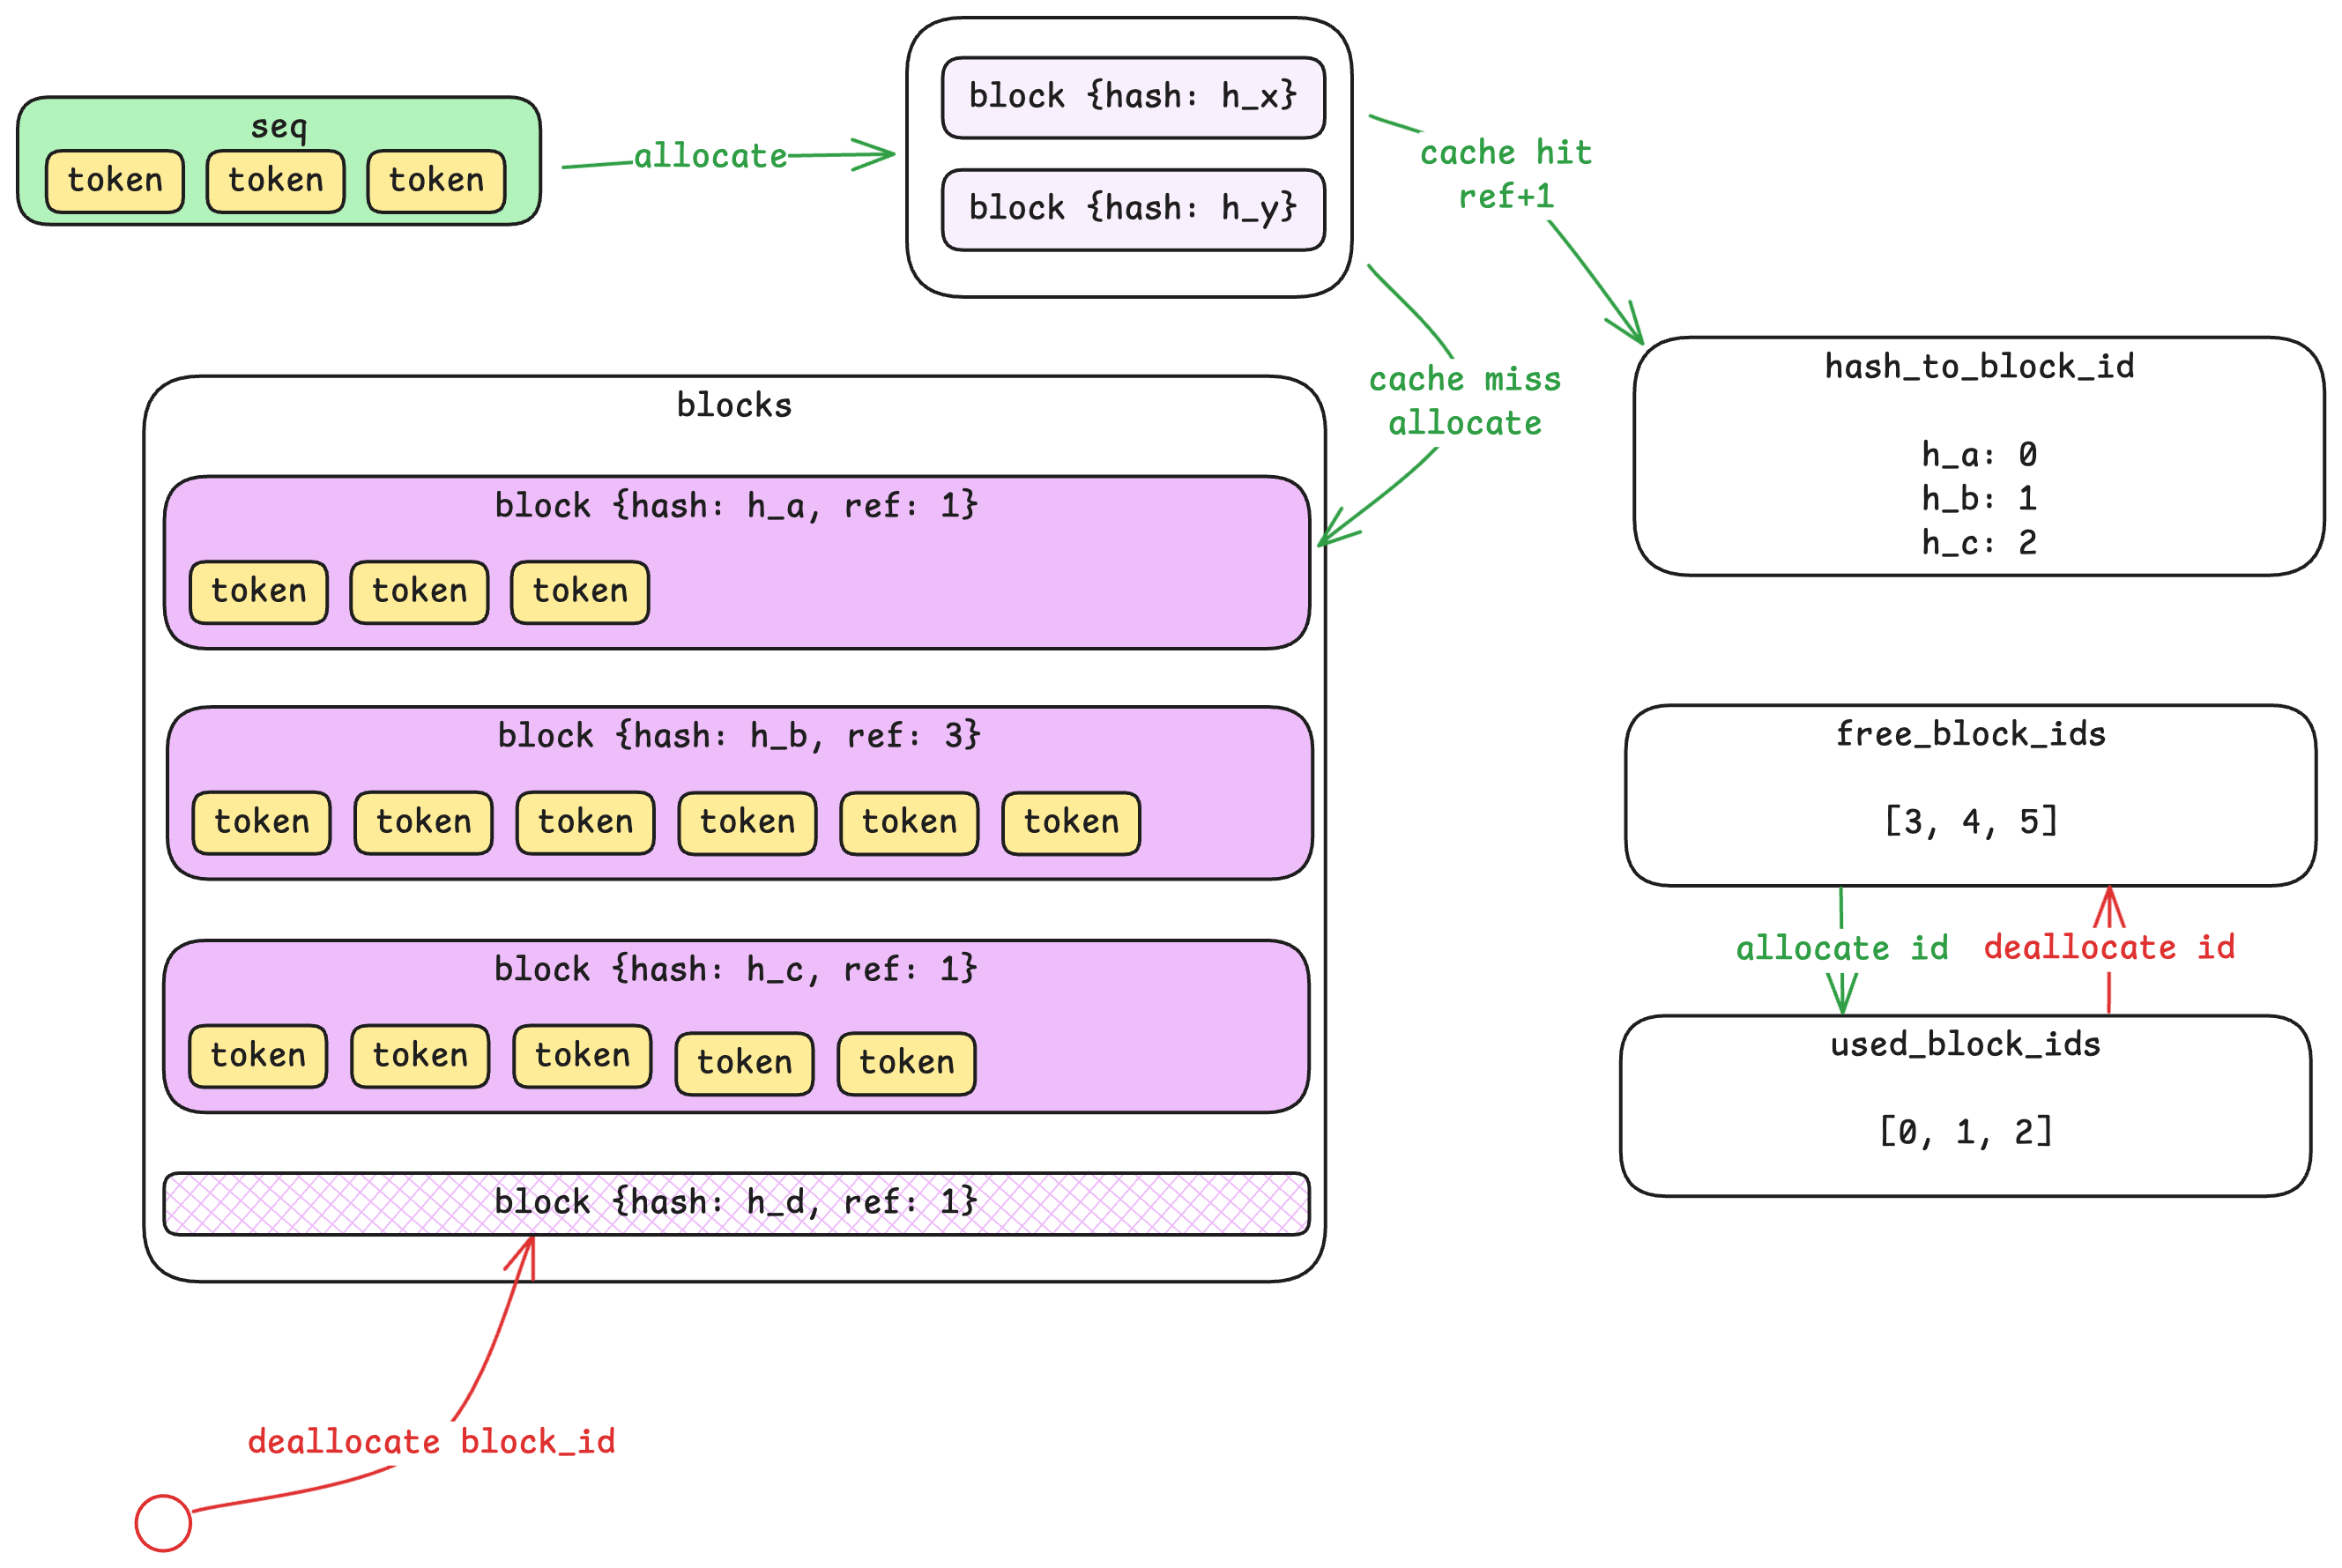
Model Runner는 실제로 GPU에서 모델을 실행하는 역할을 합니다. 단계 루프(Step Loop)가 Scheduler에서 시퀀스 배치를 가져오면, 동작(프리필 또는 디코드)과 함께 Model Runner로 전달합니다.
The Model Runner is responsible for actually executing the model on GPU(s). When the step loop retrieves a batch of sequences from the Scheduler, it passes them to the Model Runner along with the action (prefill or decode).
텐서 병렬 통신 / Tensor Parallel Communication
모델이 단일 GPU에 넣기에 너무 클 경우, Nano-vLLM은 모델을 여러 GPU에 분산하는 텐서 병렬화(tensor parallelism, TP) 를 지원합니다. 예를 들어, TP=8이면, 여덟 개의 GPU에 하나의 모델을 실행합니다.
When a model is too large for a single GPU, Nano-vLLM supports tensor parallelism (TP)—splitting the model across multiple GPUs. With TP=8, for example, eight GPUs work together to run a single model.
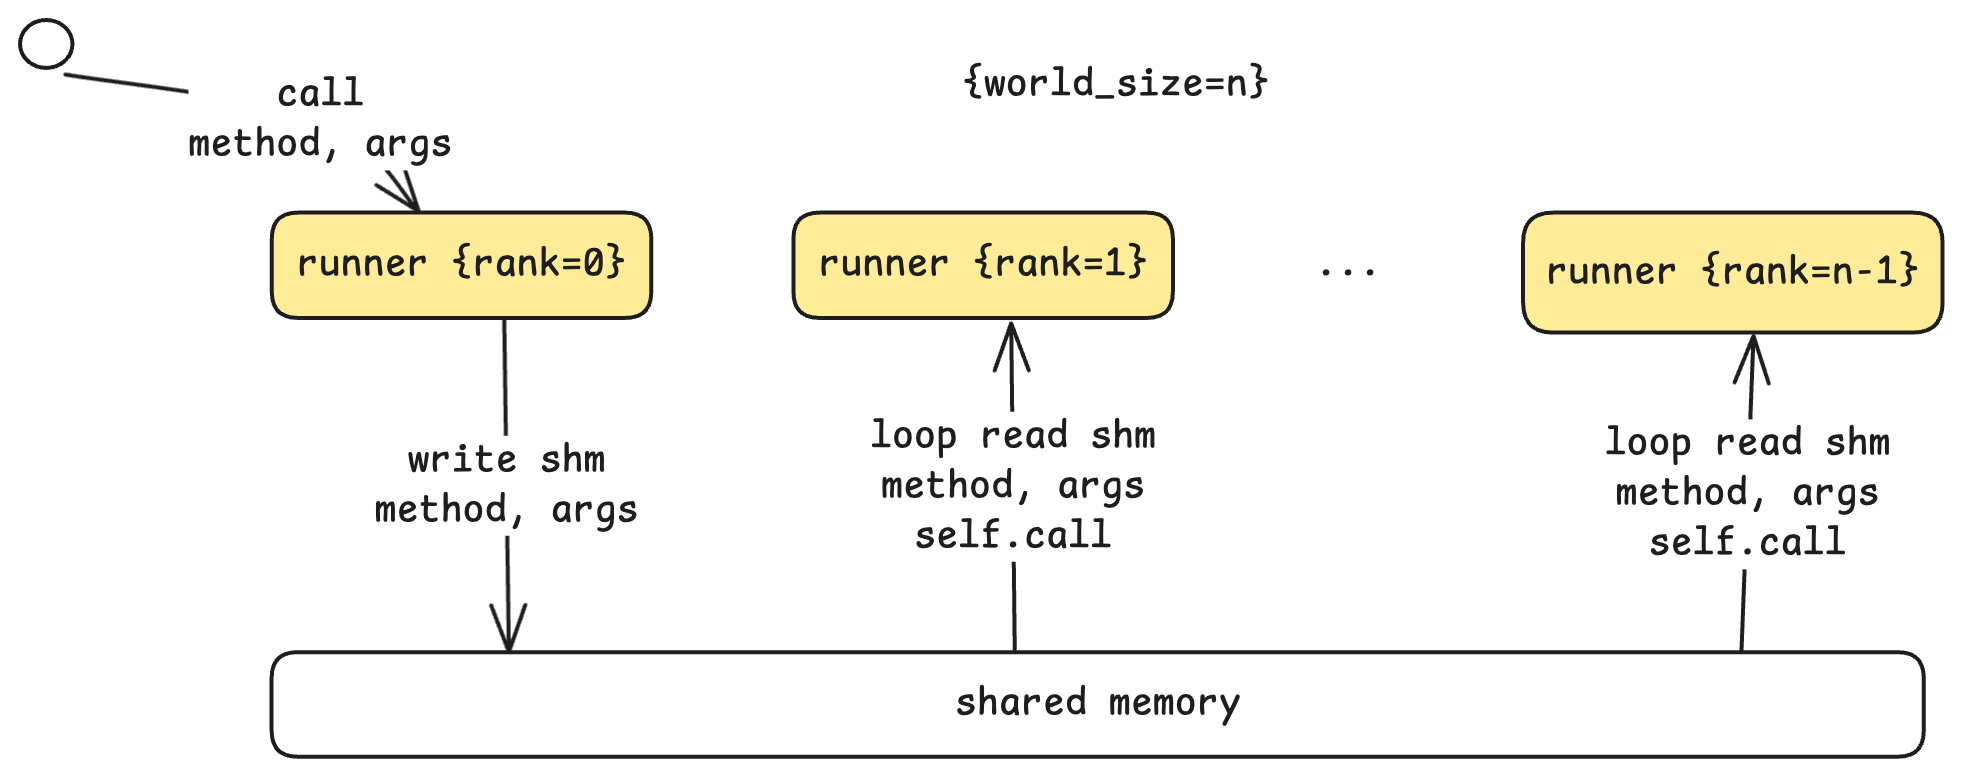
통신 아키텍처는 리더-워커 패턴(Leader-Worker Pattern)을 사용합니다:
The communication architecture uses a leader-worker pattern:
- Rank 0 (리더): 스텝 루프(Step Loop)로부터 명령을 받아 자신의 몫을 실행하고, 워커들을 조율합니다.
Rank 0 (Leader): Receives commands from the step loop, executes its portion, and coordinates with workers.
- Rank 1 ~ N-1 (워커들): 공유 메모리 버퍼를 지속적으로 폴링(polling)하며 리더의 명령을 기다립니다.
Ranks 1 to N-1 (Workers): Continuously poll a shared memory buffer for commands from the leader.
리더가 run 명령을 받으면, 메서드 이름과 인수를 공유 메모리에 씁니다. 워커들이 이를 감지하여 매개변수를 읽고, 각자의 GPU에서 동일한 연산을 실행합니다. 각 워커들은 자신의 랭크(rank)를 알기 때문에 자신이 담당하는 부분을 연산할 수 있습니다. 이러한 공유 메모리 방식은 네트워크 오버헤드가 없는 단일 머신의 다중 GPU 설정에서 효율적입니다.
When the leader receives a
runcommand, it writes the method name and arguments to shared memory. Workers detect this, read the parameters, and execute the same operation on their respective GPUs. Each worker knows its rank, so it can compute its designated portion of the work. This shared-memory approach is efficient for single-machine multi-GPU setups, avoiding network overhead.
연산 준비 / Preparing for Computation
모델을 호출하기 전에, Model Runner는 동작(action)에 따라 입력을 준비합니다:
Before invoking the model, the Model Runner prepares the input based on the action:
- 프리필 준비: 가변 길이의 여러 시퀀스를 배치로 묶고, 효율적인 어텐션 연산을 위해 누적 시퀀스 길이를 계산합니다.
Prepare Prefill: Batches multiple sequences with variable lengths, computing cumulative sequence lengths for efficient attention computation.
- 디코드 준비: 각 시퀀스별로 토큰 하나씩 가져온 뒤, KV 캐시 접근을 위한 토큰 위치 및 슬롯 매핑과 함께 배치로 묶습니다.
Prepare Decode: Batches single tokens (one per sequence) with their positions and slot mappings for KV cache access.
이러한 준비 과정에는 CPU 측 토큰 데이터를 GPU 텐서로 변환하는 과정도 포함됩니다—이 지점이 데이터가 CPU 메모리에서 GPU 메모리로 넘어가는 지점입니다.
This preparation also involves converting CPU-side token data into GPU tensors—the point where data crosses from CPU memory to GPU memory.
CUDA 그래프: 커널 실행 오버헤드 줄이기 / CUDA Graphs: Reducing Kernel Launch Overhead
시퀀스별로 토큰을 하나씩만 처리하는 디코드 단계에서는, 커널 실행 오버헤드가 실제 연산에 비해 상당히 커질 수 있습니다. CUDA 그래프는 GPU 연산 시퀀스를 한 번 기록한 다음, 다른 입력들에 대해 이를 재생하는 방식으로 이를 해결합니다. Nano-vLLM은 일반적인 배치 크기(1, 2, 4, 8, 16, 최대 512)별로 CUDA 그래프를 사전에 캡처한 다음, 최소한의 실행 오버헤드로 디코드 단계가 수행될 수 있도록 합니다.
For decode steps (which process just one token per sequence), kernel launch overhead can become significant relative to actual computation. CUDA Graphs address this by recording a sequence of GPU operations once, then replaying them with different inputs. Nano-vLLM pre-captures CUDA graphs for common batch sizes (1, 2, 4, 8, 16, up to 512), allowing decode steps to execute with minimal launch overhead.
샘플링: 로짓에서 토큰으로 / Sampling: From Logits to Tokens
모델의 출력은 단일 토큰이 아닌, 전체 어휘집(Vocabulary)에 대한 확률 분포인 로짓(logits) 을 출력합니다. 최종 단계는 이 확률 분포 중 하나의 토큰을 선택하는 샘플링 단계입니다.
The model doesn't output a single token—it outputs logits, a probability distribution over the entire vocabulary. The final step is sampling: selecting one token from this distribution.
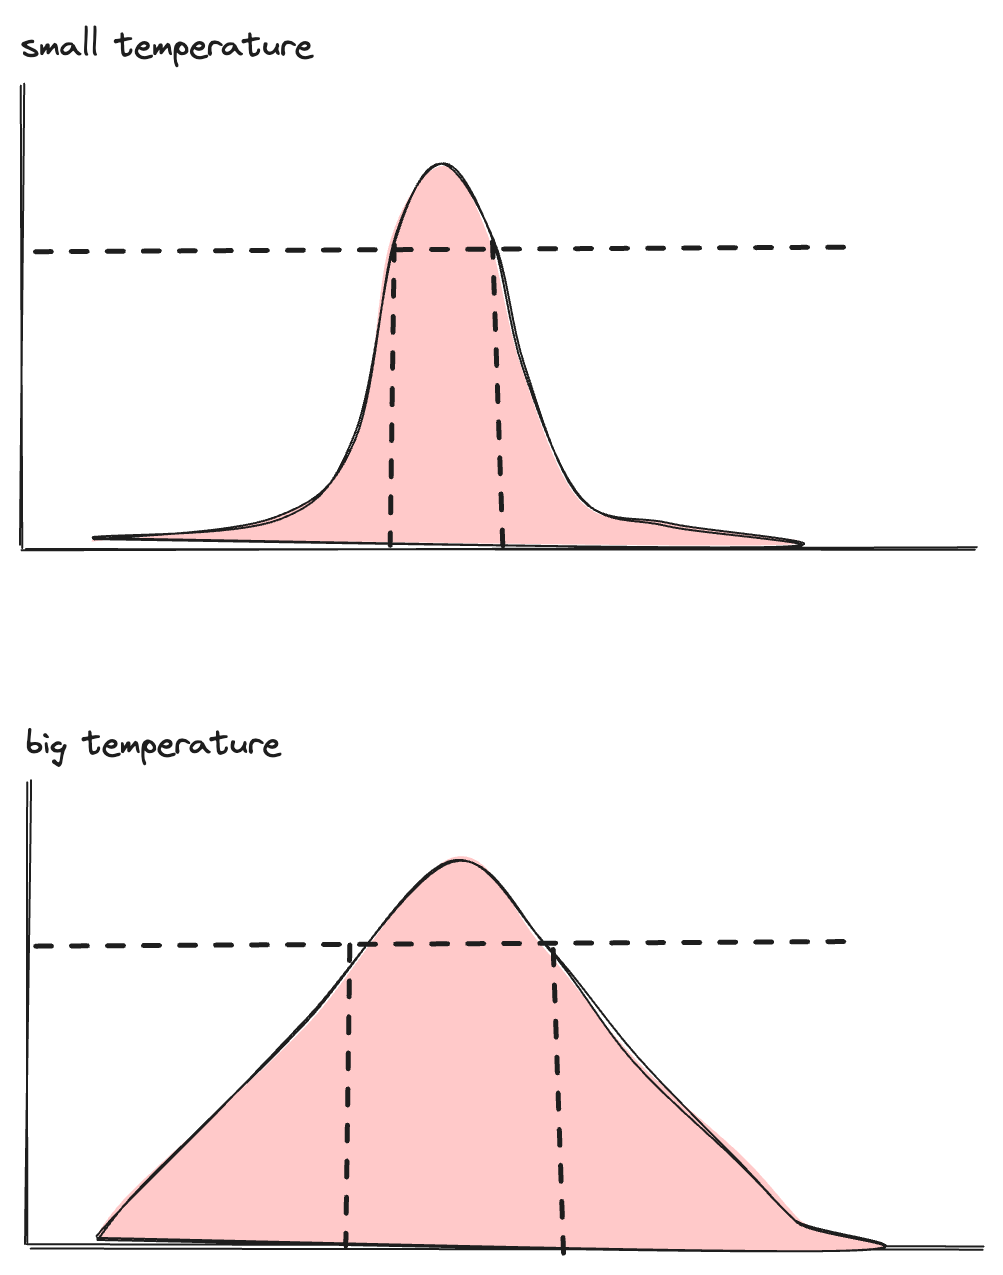
이 때 temperature 매개변수가 이 선택을 제어합니다. 수학적으로, 이는 확률 분포의 형태를 조절합니다:
The
temperatureparameter controls this selection. Mathematically, it adjusts the shape of the probability distribution:
- (0에 가까운) 낮은 temperature: 분포가 날카롭게 뾰족해집니다. 가장 높은 확률의 토큰이 거의 항상 선택되어, 출력이 더 결정론적(Deterministic)이고 집중(Focused)됩니다.
Low temperature (approaching 0): The distribution becomes sharply peaked. The highest-probability token is almost always selected, making outputs more deterministic and focused.
- 높은 temperature: 분포가 평탄해집니다. 낮은 확률의 토큰도 선택될 가능성이 높아져, 출력이 더 다양하고 창의적이 됩니다.
High temperature: The distribution flattens. Lower-probability tokens have a better chance of being selected, making outputs more diverse and creative.
LLM 출력의 "무작위성"은 바로 여기에서 비롯됩니다—그리고 동일한 프롬프트가 다른 응답을 생성하게 되는 이유이기도 합니다. 샘플링 단계는 유효한 후보 범위 내에서 선택하며, 통제된 변동성(Controlled Variability)을 도입합니다.
This is where the "randomness" in LLM outputs comes from—and why the same prompt can produce different responses. The sampling step selects from a valid range of candidates, introducing controlled variability.
다음 내용 / What's Next
다음 글(2부)에서는 모델의 블랙박스를 열어, 다음과 같은 내용들을 살펴보겠습니다:
In Part 2, we'll open the black box of model. We'll explore:
- 모델이 토큰을 은닉 상태(Hidden State)로, 그리고 다시 토큰으로 변환하는 방법
How the model transforms tokens into hidden states and back
- 어텐션 메커니즘과 멀티헤드 어텐션(MHA, Multi-Head Attention)이 중요한 이유
The attention mechanism and why multi-head attention matters
- KV 캐시가 GPU 메모리에 물리적으로 어떻게 배치되는지
How KV cache is physically laid out on GPU memory
- Dense vs. MoE(Mixture of Experts) 아키텍처
Dense vs. MoE (Mixture of Experts) architectures
- 텐서 병렬화가 연산 수준에서 어떻게 동작하는지
How tensor parallelism works at the computation level
이러한 내부 구조들을 이해하면, 프롬프트 문자열부터 생성된 텍스트까지, 빠진 부분 없이 전체 그림이 완성됩니다.
Understanding these internals will complete the picture—from prompt string to generated text, with nothing left hidden.
이 글은 GPT 모델로 정리한 글을 바탕으로 한 것으로, 원문의 내용 또는 의도와 다르게 정리된 내용이 있을 수 있습니다. 관심있는 내용이시라면 원문도 함께 참고해주세요! 읽으시면서 어색하거나 잘못된 내용을 발견하시면 덧글로 알려주시기를 부탁드립니다. ![]()
![]() 파이토치 한국 사용자 모임
파이토치 한국 사용자 모임![]() 이 정리한 이 글이 유용하셨나요? 회원으로 가입하시면 주요 글들을 이메일
이 정리한 이 글이 유용하셨나요? 회원으로 가입하시면 주요 글들을 이메일![]() 로 보내드립니다! (기본은 Weekly지만 Daily로 변경도 가능합니다.)
로 보내드립니다! (기본은 Weekly지만 Daily로 변경도 가능합니다.)
![]() 아래
아래![]() 쪽에 좋아요
쪽에 좋아요![]() 를 눌러주시면 새로운 소식들을 정리하고 공유하는데 힘이 됩니다~
를 눌러주시면 새로운 소식들을 정리하고 공유하는데 힘이 됩니다~ ![]()